How X.509 Certificates Work, Using the One on This Site
I spend most of my time shipping Next.js apps on Vercel, and NestJS APIs behind them. HTTPS is usually something the platform just handles. Then a custom domain fails to issue, or a browser shows a certificate error, and I am staring at a PEM file I only half understand. I wanted a clear picture of that file, so I started with this site's certificate.
What an X.509 certificate is
An X.509 certificate is a standard format for a public key certificate. In plain terms, it is a signed statement that this public key belongs to this name.
On the web, the name is usually a domain, and the protocol is TLS, which is what HTTPS runs on. The public key goes in the certificate, where anyone can read it. The private key stays on the server, or with the host. For this site, Vercel holds it. I never uploaded a PEM to get HTTPS working.
A Certificate Authority (CA) signs that statement. Your browser does not start by trusting my site. It trusts a small set of root CAs already shipped with the browser or the operating system. If one of those CAs, or an intermediate they authorised, signed the certificate, and the other checks pass, the connection is trusted.
The fields I actually look at
These are the fields I care about when something breaks.
Subject. Who the certificate claims to be. On www.mfaeezshabbir.me, the subject common name is www.mfaeezshabbir.me.
Issuer. Who signed it. Mine says Let's Encrypt, with the common name YR2. That is an intermediate CA, not the root.
Validity. A notBefore and a notAfter date. The certificate on this site is valid from 14 October 2026 to 12 January 2027, the usual Let's Encrypt window of about 90 days. Vercel renews it for me.
Public key. The key bound to that name. On this site it is a 2048-bit RSA key. You will also see ECDSA keys in the wild. During the TLS handshake the server proves it holds the matching private key. Anyone can download the certificate, so the certificate alone is not proof.
Subject Alternative Name, or SAN. The DNS names (and sometimes IP addresses) the certificate is valid for. Modern browsers match the hostname you typed against the SAN, not only the common name. The certificate for www.mfaeezshabbir.me lists only that name. The apex, mfaeezshabbir.me, has its own Let's Encrypt certificate. A certificate for one will not cover the other.
Signature. The issuer's digital signature over the rest of the certificate. If a single field is altered, the signature no longer verifies, and the certificate is rejected.
Other extensions are worth a glance. On a site certificate, Basic Constraints should say this is not a CA, and Key Usage and Extended Key Usage should allow TLS web server authentication.
The chain of trust
A site certificate is a leaf, and it is not trusted on its own.
When I connected to this site, openssl showed the leaf for www.mfaeezshabbir.me, signed by Let's Encrypt YR2; that intermediate, signed by ISRG Root YR; and a certificate for ISRG Root YR, signed by ISRG Root X1. ISRG Root X1 is the Let's Encrypt root that has been in trust stores for years. The extra Root YR certificate, signed by X1, lets clients that do not yet trust Root YR on its own still build a path to a root they already have.
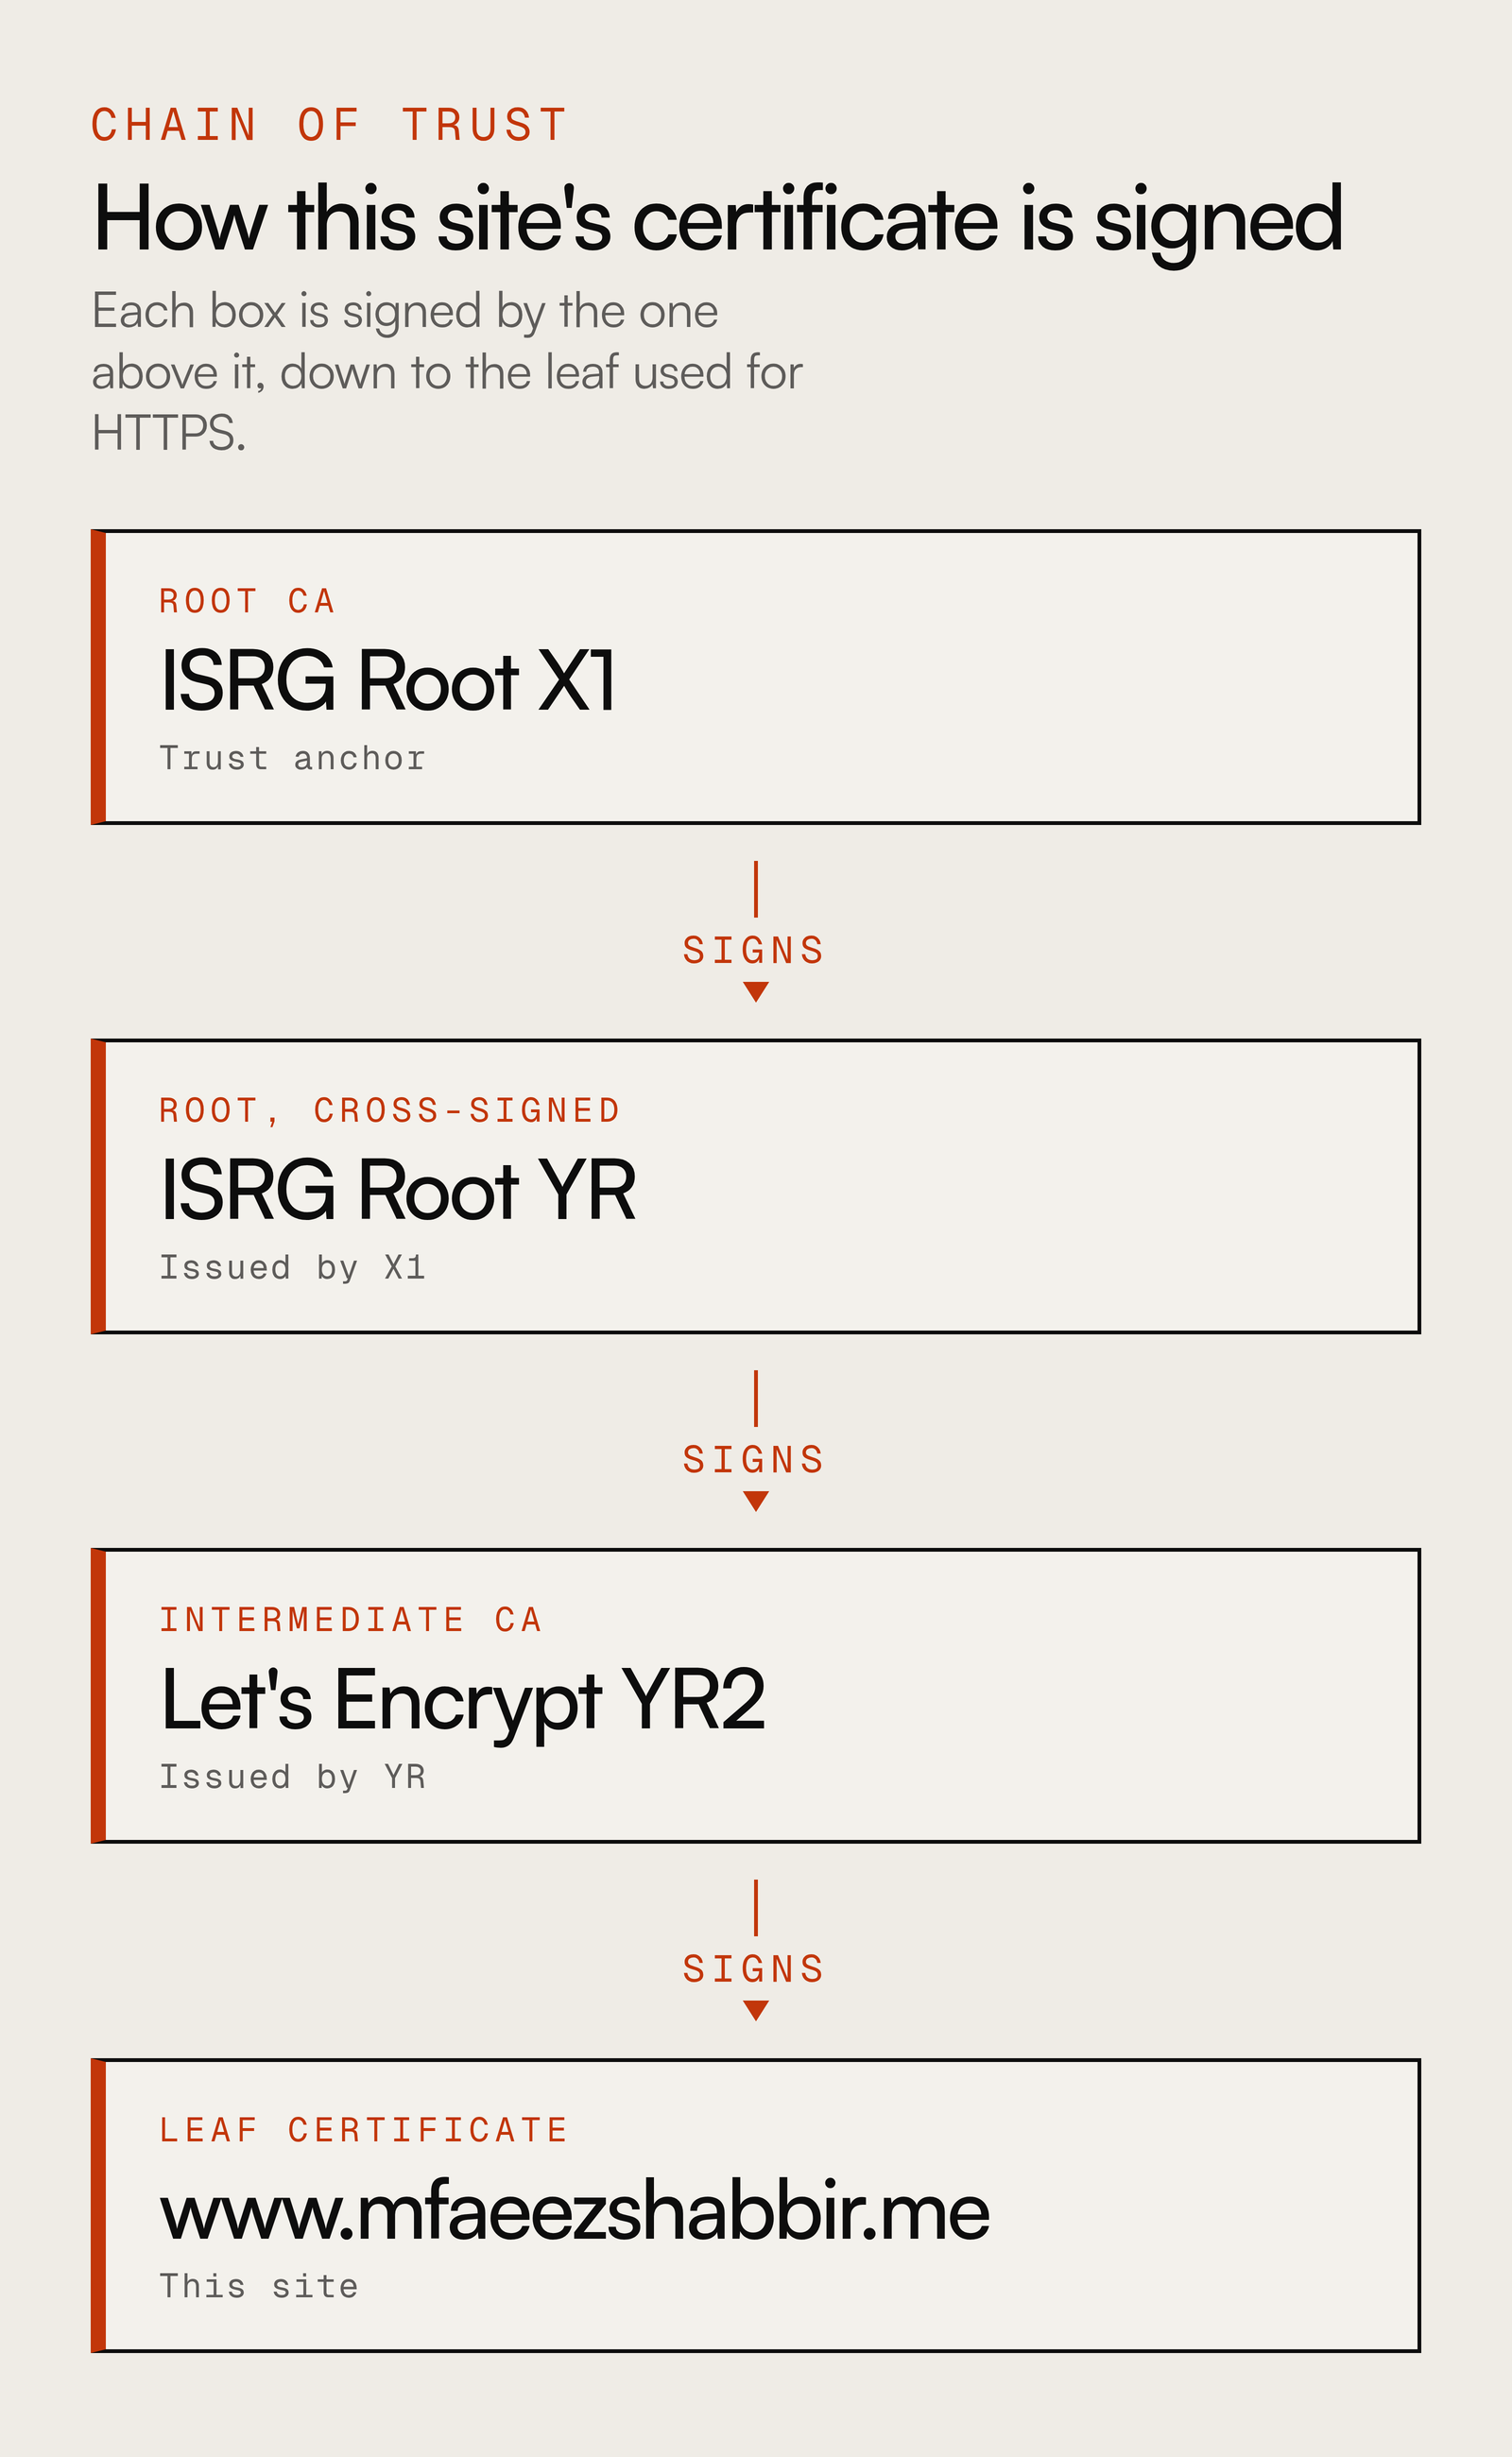
The browser walks this path upwards. Each signature must verify, each issuer name must match the next certificate's subject, and intermediates must be allowed to issue. The walk has to end at a root the client already trusts. If a NestJS or VPS setup sends only the leaf and forgets the intermediate, some clients fail with a chain error, even though the leaf itself is valid.
What the browser checks
A TLS server check looks like this:
- The hostname you requested matches a name in the SAN. The client also sends that name in the handshake as SNI, so a host that serves more than one domain can pick the right certificate.
- The current time sits inside the validity window. A bad clock on a server or in a container can make a good certificate look expired, or not yet valid.
- The signatures work, up the chain, to a trusted root.
- The certificates are being used for the right job. A leaf should not be a CA. A website certificate should be valid for server authentication.
- Some clients also check revocation, through a CRL or OCSP. Let's Encrypt publishes CRLs. This covers certificates that later need to be treated as untrusted, for example if a private key was exposed.
If any of those fail, you get a familiar error: a name mismatch (NET::ERR_CERT_COMMON_NAME_INVALID), an expired certificate, an untrusted or incomplete chain, or a warning about a self-signed certificate.
Where this shows up in the work I ship
On Vercel, a custom domain is enough to get a Let's Encrypt certificate issued and renewed. I still have to get DNS right. If the HTTP-01 challenge cannot see the domain, issuance fails, and HTTPS never comes up. I do not manage the private key for this site, and I should not.
Local NestJS is different. A self-signed certificate is fine on my machine. It is not fine if a Next.js route handler or a customer's browser has to talk to that server. They will reject it unless they trust that CA. In development I usually keep HTTP on localhost.
The mistakes behind most of those errors are simple:
- A SAN that does not include the hostname in the address bar, including
wwwversus the apex, or a preview URL versus production. - A certificate that expired because auto-renewal could not complete after a DNS change.
- A leaf installed on nginx, Caddy, or a Node TLS server without the intermediate.
- A common name set and the SAN left empty.
- A private key committed to the repo, or worse, shipped to the browser. The certificate can be public. The key cannot.
Mutual TLS, or mTLS, is the same idea with both sides presenting a certificate. In ordinary HTTPS, only the server proves who it is. With mTLS, a NestJS service also checks a client certificate against a CA it trusts. That is useful between services when a shared secret in a header is not enough, especially if the network between them is not fully private. You have to issue, rotate and replace those certs, so I would use it only where that proof is worth the cost.
How to inspect a certificate with openssl
This is the first command I run. It prints the subject, issuer, dates and SAN for the leaf:
echo | openssl s_client -connect www.mfaeezshabbir.me:443 -servername www.mfaeezshabbir.me 2>/dev/null | openssl x509 -noout -subject -issuer -dates -ext subjectAltName
On this site, that output is:
subject=CN=www.mfaeezshabbir.me
issuer=C=US, O=Let's Encrypt, CN=YR2
notBefore=Oct 14 14:15:19 2026 GMT
notAfter=Jan 12 14:15:18 2027 GMT
X509v3 Subject Alternative Name:
    DNS:www.mfaeezshabbir.me
To read the full leaf, with the public key and extensions:
echo | openssl s_client -connect www.mfaeezshabbir.me:443 -servername www.mfaeezshabbir.me 2>/dev/null | openssl x509 -noout -text
To see every certificate the server sends, not just the leaf:
echo | openssl s_client -connect www.mfaeezshabbir.me:443 -servername www.mfaeezshabbir.me -showcerts
If you already have a PEM file, such as a local NestJS cert:
openssl x509 -in cert.pem -noout -subject -issuer -dates -ext subjectAltName
-servername is the SNI name. Use the hostname you care about. If you omit it, you can easily inspect the wrong certificate on a host that serves more than one site.
What I take from this
I do not need to memorise the standard to ship a Next.js app. I do need to know what the fields mean, why the chain has to be complete, and how to read a certificate when a TLS error shows up. openssl tells me whether I have a name problem, a date problem, or a chain problem.
This post started after I read Shubham Patel's beginner guide to X.509 certificates. It got me thinking about the topic, and I wanted to write down how it shows up in the work I ship.
Keep reading